


Product: MJP
Industry: Automotive and Transportation
Joe Carmody takes pride in all of his company’s 3D printing work for Nissan Motorsports (NISMO), but his biggest passion is direct digital manufacturing of parts that sometimes go from concept to the race track within a week. It’s there, literally, where the rubber meets the road.
Direct digital manufacturing, also called additive manufacturing, is the process of 3D printing a working part layer by layer directly from a digital file.
“We do all kinds of 3D printing work — concept modeling, verification, prototyping — but direct digital manufacturing of end-use parts is the biggest opportunity,” says Carmody, president of evok3d, co-housed in the Nissan NISMO facility outside Melbourne, Australia.
evok3d produces its bespoke parts for Nissan using various 3D printers, including a 3D Systems ProJet 660Pro for conceptual and prototyping work and ProJet MJP Plastic additive manufacturing and industrial SLS systems for high-precision, functional parts that prove their mettle in the V8 Supercar Championship series. The 15-round Australian racing series comprises two types of races — sprint and endurance — providing a diverse set of challenges for competitors.
Most of the work occurs in the heat of the racing schedule, when adjustments are made in the so-called downtime between races, which can be anywhere from a week to four weeks. It’s not just a matter of increasing speed, but continuously improving reliability and finding out how to eliminate or reduce malfunctions — both human and machine.
“Direct digital manufacturing is ideal for racing applications, which require that cars are continuously improved and component designs iterated upon within small timeframes,” says Carmody.
For Nissan NISMO teams, the learning curve is steep and fast. Nissan started racing in V8 Supercar in 2013. It is competing against other teams that have raced in the series since its inception as the Australian Touring Car Championship in 1993. There’s a lot of catching up to do, and 3D printing is seen as a key tool in closing the experience gap.
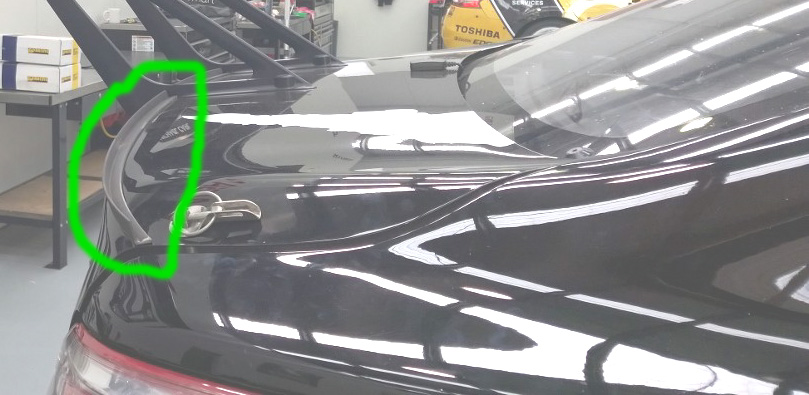
Shortly after signing on with Nissan NISMO, the team faced an immediate challenge: improving the aerodynamics of Nissan Altima racecars. The rear wing wasn’t generating enough down force, which hindered cornering ability and speed. Nissan engineers went to work and developed what is known as a gurney flap — a small, curved strip extending off the rear trunk that, if done right, can dramatically improve aerodynamics.
“It’s a complex piece of geometry,” says Carmody, “with compound curves that would be difficult to manufacture using traditional modes.”
After receiving the design files from Nissan, the team went to work producing the part on the ProJet MJP 3D printer. Introduced in early 2013, the printer is designed to produce functional plastic parts and investment casting wax patterns for professional-grade design and manufacturing applications.
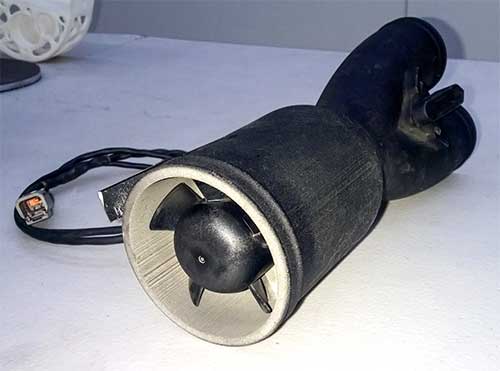
Soon after, the team put its direct manufacturing abilities to work on a driver cooling system. Track temperatures at V8 Supercar venues can reach 100 degrees Fahrenheit and top 150 degrees inside the racecar, making it critical that the driver cooling system operates continuously and reliably.
A key component of the cooling system is the air feed to the driver’s helmet. The system comprises a dry ice box to cool the air, a filter to clean the air, a pump to generate airflow, and ducting to conduct cool air into the driver’s helmet.
evok3d’s assignment was to build a lightweight, one-piece housing for the air pump. It might sound simple, but achieving the right combination of weight, functionality and reliability isn’t an easy engineering task.
“It would be difficult to manufacture in a single piece using subtractive or injection manufacturing processes,” says Carmody, “but we were able to support the overall design goals by creating a single piece using the ProJet MJP with VisiJet M3 Black material that provides the flexibility and strength required for a production part.”
While Carmody sees direct digital manufacturing as the biggest opportunity for 3D printing, there is also great value in generating small-volume parts for concept modeling, prototyping and pre-production.
evok3d has used the ProJet 660Pro printer to create a complex mold for an air intake system and the master of a carbon fiber gear-shift cover that helps prevent drivers from accidentally putting the race car into gear during driver changes in endurance races.
Carmody believes that many of the prototypes evok3d now creates will eventually be printed as production parts as costs continue to spiral downward and new design techniques are adopted.
“Designing for 3D-printed parts presents a whole different landscape for engineers who have designed for traditional manufacturing,” he says. “But there is great value in being able to unitize parts, eliminate assembly, reduce weight and increase efficiency through 3D printing. Direct digital manufacturing enables you to place material exactly where you want it for maximum performance and reliability.”

Product: SLS Printing
Industry: Academic
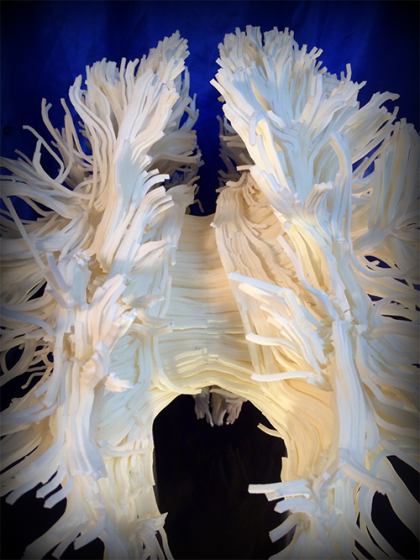
The human brain—an organ that, despite ever-advancing technology to scan and understand it, still remains very much a mystery to researchers and scientists. But that technology is allowing those researchers to advance the understanding more quickly, and it forms the basis of the Philadelphia-based Franklin Institute’s new exhibit, Your Brain.
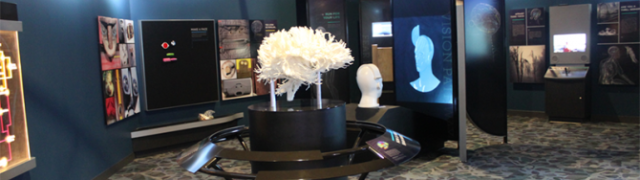
This vivid and interactive exhibit features a two-story neural network climbing model with lights and sounds that are triggered by footsteps. Numerous hands-on exhibit devices allow greater understanding of how our minds work, while another central feature is an intricate and stunning 3D printed model of the white matter patterns in the brain.
Lead exhibit developer Dr. Jayatri Das, Chief Bioscientist at The Franklin Institute, devised the displays as part of the new building expansion at the institute.
“Our philosophy behind our exhibits is to make real science approachable through hands-on, engaging exhibits,” said Dr. Das. “From an educational point of view, we knew that the concept of functional pathways needed to be an important aspect of brain science that was addressed in the exhibit, and diffusion tensor imaging gets to the heart of the real science through which scientists try to understand the wiring of these pathways. The 2D images we had seen were really beautiful, so we thought that a large-scale 3D print would be perfect as an intriguing, eye-catching sculpture that would serve as both a unique design focus and a connection to research.”
The museum approached researcher Dr. Henning U. Voss, Associate Professor of Physics in Radiology at Weill Cornell Medical College. Dr. Voss has conducted a decade of research into brain neuron mapping, using MRI scans to create 3D tractograms of brain matter.
“The human brain consists of white and gray matter. The white matter of the brain contains fibers that connect gray matter areas of the brain with each other,” he said. “Using an MRI scan of a 40-year-old man, we calculated diffusion tensors, and then created the white matter fiber tracts from them. We handed a surface model of the fiber tracts to Direct Dimensions for processing.”
The 3D data file was huge and complex, and its sheer size made it a challenge to view and share, let alone 3D print it.
Dr. Das and the team had long planned to 3D print the intricate 3D model. Once they had the data, they approached numerous 3D printing providers, only to be turned down.
“Everyone told us it was way too complex to handle on a 3D printer,” said Donna Claiborne, Exhibit Project Manager at The Franklin Institute. “We were surprised because everything we knew about 3D printing said that it was good with complex shapes.”
And the model was very complex. Each white matter pattern was described as a “strand,” and it had about 2,000 strands in the data. But the apparent beauty created by the complex strands was causing the model to be rejected.
The team at The Franklin Institute kept searching for a 3D print expert that would accept the challenge. They finally landed on Direct Dimensions of Owing Mills, MD. The team there, headed by CEO Michael Raphael, has been advancing 3D scanning, capture and digitization for 20 years and has a staff expert at every form of 3D. Their Art Director, Harry Abramson, took one look and knew what it would take to complete the project.
“We have an extensive track record working with extremely complex forms for 3D printing and digital art fabrication. I knew we could do it, the question was could we do it on budget!” said Harry.
Harry contacted his long-time 3D printing partner, Jason Dickman, president of American Precision Printing (APP), a 3D printing service bureau located in Tulsa, OK. “For an object this complex AND fragile in design, SLS from 3D Systems was the only choice. I called Jason and we went over the size constraints of the build envelope, the volume of the object and our lead time, and very quickly I had a price and his guarantee that they could build the brain as long as we could prepare the files. What we lacked in budget, we made up with having a long lead time, so the project was a go!”
“Fortunately Dr. Voss provided an amazing data set for us to start with. In order to print this at large scale, each of the thousands of strand models would have to be fused to create a single brain model that could then be sliced into printable parts that fit in the build envelope. The whole model would then need engineering and design modifications to ensure that it could be assembled precisely and support itself on its custom mount.”
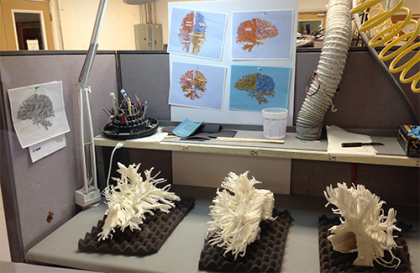
Ultimately it took weeks of grueling work to prepare this file for APP. “This work required a highly skilled technician with just the right disposition. Without the right human resources, this project would have never happened,” said Harry. “With about 2,000 strands to sort through, it was a task of immense proportions. Mind boggling in fact.”
SLS technology from 3D Systems uses layers of plastic powder that are fused into a 3D definition by powerful CO2 lasers. The materials are robust enough for widespread aerospace and automotive uses, so they knew it would be perfect for this project.
The Direct Dimensions team worked on cutting the 3D data into pieces that could be printed within the size limitations of the SLS system. Once the re-engineered data was received from Direct Dimensions, the APP team went to work creating pieces of the model that would be printable on the sProHD 60 SLS machine at the Tulsa facility.
“The main challenge from my side was that the model is 26 inches long, my SLS machines are limited to a build size of 18 inches,” said Jason at APP. “We would have to build, map, and assemble 10 abstract pieces into one single part.”
The team at APP used 20-22 hours for each build to complete. Once they came out of the printer, the team started to map and assemble the pieces into the finished model. Despite the extensive re-engineering of the 3D data, there were still a number of unattached strands that had to be assembled.
“It was a lot of work for all the teams, but we all knew from the first part that this was going to be stunning,” said Jason. “It is a perfect example of the power of 3D printing and we were glad to be a part of something so powerful.”
The piece, mounted in a Plexiglas box with lighting underneath the 3D printed model, forms a stunning centerpiece to one of the exhibit galleries.
“It has really become one of the iconic pieces of the exhibit. Its sheer aesthetic beauty takes your breath away and transforms the exhibit space,” said Dr. Das. “The fact that it comes from real data adds a level of authenticity to the science that we are presenting. But even if you don’t quite understand what it shows, it captures a sense of delicate complexity that evokes a sense of wonder about the brain.”
Said Dr. Voss, “The 3D printed model is awesome and utterly exceeds even my most optimistic expectations. This was a fantastic project with an amazing team of people who made it come together.”
Product: SLS Printing
Industry: Design and Art
Restoration is a major undertaking. Beyond the painstaking care essential to preserve and stabilize historical structures, restoration includes lots of research and planning to return relics to a known or assumed state with as much integrity as possible.
When the Historic Royal Palaces (HRP) in the United Kingdom began its undertaking to restore The Great Pagoda, Kew, it faced some monumental challenges. Several key design elements from the original building had been lost to history, and replacing them quickly proved challenging in terms of cost, logistics and design. Yet by bringing the technologies and expertise of 3D Systems On Demand Manufacturing to this project, this effort was made not only manageable, but efficient.

Using a scan-to-CAD workflow with selective laser sintering (SLS) additive manufacturing, 3D Systems On Demand Manufacturing team delivered durable and repeatable fixtures for HRP’s restoration effort. Far from a hands-off process, the team contributed many hours of frontend engineering and backend finishing to provide high quality full-service design and manufacturing expertise.
Though popular opinion of King George III may be divided, there is no denying the impact of his 59-year reign. Beyond the countless volumes of extensive studies and films on his life and rule, his legacy is steeped into the very earth of the lands he governed – particularly at The Royal Botanic Gardens, Kew. A UNESCO World Heritage Site, the gardens are home to The Great Pagoda, a striking 163-foot structure commissioned in 1761 and built in ornate and highly fashionable Chinoiserie style.
In the years following the pagoda’s unveiling, it drew crowds of tourists who came to marvel at its exotic and eye-catching details. Central to all conversations were the 80 painted wooden dragons that adorned the octagonal corners of each successive level.
The talk of the town for more than twenty years, the Kew dragons were removed in the 1780s to accommodate roof repairs to the pagoda and were never replaced. Although rumors allege the dragons served as payment for royal gambling debts, experts believe the wood had simply rotted over time. An often revisited topic for conservationists, The Great Pagoda is finally being returned to its former splendor, dragons and all, for the first time in over 200 years. As part of a restoration project undertaken by HRP and the Royal Botanic Gardens, Kew, this batch of dragons is designed to stand the test of time with special reinforcement by modern technology.
As HRP began to explore methodologies for replacing the dragons, it faced a dilemma: not only would wooden replacements invite the same longevity issue as before, but the pagoda had not supported the weight of the dragons for two centuries. “One of the most challenging aspects of this project was to minimize the impact imposed by so many dragons on this grade one listed building,” said Craig Hatto, Project Director at Historic Royal Palaces. Concerned that the aged structure may respond poorly to the sudden reintroduction of 80 full-weight, large-scale ornaments, HRP wanted to explore a lighter-weight alternative to help guarantee a successful and incident-free installation. Paired with these practical considerations were the equally valid issues of the time and costs associated with traditional materials and processes.
HRP was looking for a restoration solution that would answer the quality, weight, time and cost concerns inherent to the project. In searching for a supplier capable of delivering on all aspects, HRP asked 3D Systems to submit a competitive tender, which it subsequently won on the basis of being able to provide the expertise, technology, quality and scalability required to fulfill the project.
The Kew dragons were brought to life as a collaborative effort between two sets of specialized designers. The exterior appearance of the dragons was recreated by HRP using the scarce historical information available to achieve the most accurate representation possible. Once designed, a dragon prototype was carved from wood to enable the digital manufacturing workflow that followed, undertaken by the second design and engineering team at 3D Systems. Seven additional wooden dragons were carved to adorn the first level of the pagoda, leaving 72 to be created using SLS printing.
Using a reverse engineering workflow and a FARO® Design ScanArm, the carved wooden dragon was scanned into a 3D design environment that would allow 3D Systems to address HRP’s concerns regarding weight. 3D Systems’ design experts used a variety of software including Geomagic® Design X™ to reverse engineer the scan data into CAD and hollow the scan data to a controlled thickness, preserving both the exterior details and structural integrity in the process.
When combined with the intricate exteriors of the hand cut masters, the resulting hollow geometry was too complex to be manufactured traditionally and required additive manufacturing for production. Using a digital manufacturing workflow also enabled 3D Systems to seamlessly scale the dragons to achieve a slightly different size for levels two through ten of the pagoda. In total, 18 designs were prepared, comprised of nine different dragon sizes and a left- and right-hand version of each.

3D Systems’ engineers incorporated another simple yet compelling feature into each of the dragon designs by adding built-in mounting features directly into the CAD files. These designs constituted part of the dragons’ construction designs, and were devised and implemented by 3D Systems’ On Demand Manufacturing team in close collaboration with Hockley & Dawson, the other lead engineering team on the project. Due to the mechanics required for reinforcement and mounting, each of the 18 dragon variations required individual attention and design work.
“The final dragons are essentially a perfect copy of the original, but have been improved upon in a way that is invisible to the observer,” said Nick Lewis, General Manager UK, 3D Systems On Demand Manufacturing. “We engineered internal elements for a secure mounting process, but designed them in such a way as to be completely concealed so no nuts, bolts or traces of construction will be visible.”
Taking advantage of the ability to design for additive manufacturing, 3D Systems’ On Demand Manufacturing team incorporated a series of screws, threads and covers that follow the exact form of the dragons along the spine. “The final structures we delivered take advantage of the unique value that can be extracted from the additive process,” said Lewis. “Engineering in this way is common practice for us, but it is still miraculous to our customers. The wow-factor makes it fun to reveal, but to me it’s about being resourceful and solving problems more effectively and efficiently, which is a central benefit of using our technology.”
3D Systems’ engineering expertise is built into each of the 18 different versions of the dragons that were SLS printed. As 3D Systems On Demand Manufacturing Regional Sales Manager Simon Hammond points out, the ability to match precision with variety is a consistent benefit of using additive manufacturing for production. “Many hours of careful engineering work were put into the final designs, but by using a digital workflow with 3D CAD and 3D printing, we are able to frontload the time investment,” Hammond says. “Once final files were ready, we could launch into production with 18 different outcomes without 18 sets of tooling and molds. Designing and manufacturing the same outcome with good cost and sensible timing would be challenging for any other process.”
Following 3D scanning and design, early prototypes of the dragons were printed for analysis and testing to ensure the final designs were built in accordance with the stringent requirements of modern construction.
Throughout this process, 3D Systems worked diligently to deliver on the customer’s aesthetic requirements while meeting all the technical requirements of the builders. These considerations came into play as 3D Systems’ engineers determined how to best divide the SLS models for printing as well as position and conceal the various caps and closures for mounting.
3D Systems’ On Demand Manufacturing teams in the UK and the Netherlands printed the dragons using SLS technology. Due to the large scale of the dragons, each with final dimensions in the 1.2 – 2 meter range, 3D Systems sPro® 230 SLS machines were chosen for the task. With a maximum build volume of 550 mm x 550 mm x 750 mm, the sPro 230 enabled the dragons to be produced in a low number of large pieces that were expertly assembled by the 3D Systems team.
The dragons were 3D printed in DuraForm® PA, a durable polyamide 12 nylon material capable of producing a comparable look and feel to the original dragons. The resolution and mechanical properties of DuraForm PA make it an ideal candidate for complex parts with thin walls or snap fit requirements. In the case of the Kew dragons, these features suited both the functionality requirement of installation as well as the cosmetic requirements of the historic restoration. Once printed, the dragons were finished and hand painted in the UK by the 3D Systems High Wycombe finishing department. 3D Systems’ team also painted the final wooden dragons to ensure visual consistency across the project.
“3D Systems is greatly honored to have been selected for this project,” said Lewis. “In addition to the rare opportunity to help restore a cultural and historical landmark, this project showcases the extreme element of what we do. Our expertise extends far beyond 3D printing and we were able to offer guidance across multiple stages of this restoration, from engineering and scalable production through to finishing.”
After standing for 200 years without its proper ornamentation, The Great Pagoda, Kew, will finally be restored to draw curious crowds once more. “Over the decades, many have tried and failed to recreate the lost dragons at Kew, which has now only become possible through the innovative use of 3D printing,” says Hatto. “The specialist team developed an innovative, lightweight and durable solution, which has ultimately allowed us to return these lost icons to this treasured royal building. The dragons can take their rightful place within this UNESCO World Heritage Site and once again be part of the London skyline for many years to come.”
Whether you are seeking full reverse engineering and low volume manufacturing services or need fast turn 3D printed parts, advanced prototyping or appearance models, 3D Systems On Demand Manufacturing can help. Technologies include a broad array of 3D printing technology and finishing expertise as well as conventional CNC, urethane casting and injection tooling.
Product: SLS Printer
Industry: Consumer products
Nearly every piece of high-fidelity (hi-fi) equipment seeks to claim live-performance sound quality, yet many of these products are manufactured very similarly to their box speaker counterparts. The HYLIXA loudspeaker by Node-Audio represents a true departure and hi-fi industry breakthrough, made possible by using selective laser sintering (SLS) 3D printing to produce a distinctive, complex cabinet structure. According to David Evans, industrial designer and co-founder of Node, this revolutionary new speaker was not only produced with 3D printing; it was inspired by the capabilities additive manufacturing makes possible.
Industrial designers Ashley May and David Evans entered the hi-fi world because they saw an opportunity to do something that had never been done. With access to a 3D Systems SLS 3D printer in their production facility, they put their heads together to devise a high-value, high performance product that took advantage of the additive process.
“It was like a fresh start for us as designers,” says Evans. “We’ve always known how to design things so they could be manufactured in a particular way, whereas this sort of threw everything out the window and opened up our imaginations to what was possible.”
SLS, or selective laser sintering, is an additive manufacturing technology that fuses powdered materials together in a self-supported build style. Because of this layer-by-layer manufacturing process, it is possible to achieve far more complex and organically shaped components than conventional manufacturing methods allow.
With the industrial design component under control, Evans and May enlisted the help of an acoustic engineer to guide the technical development of a new loudspeaker. Their vision was to create a loudspeaker that produces audio quality that rivals a live experience, with beautiful, sculptural aesthetics.
The development process began with 3D designs from Evans and May that then ran through specialized 3D audio simulation software to inform the next iteration. As the simulation output began to confirm the next-level sound the team was after, they began to prototype and refine further, until finally arriving at Node’s flagship product, HYLIXA.
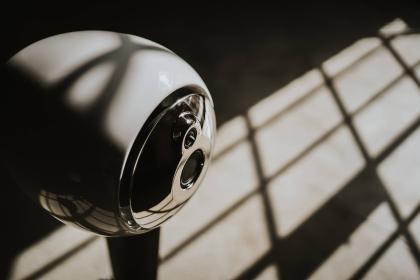
HYLIXA speakers feature a conical cabinet with a patent-pending helical transmission line that spirals for 1.6 meters around the cabinet interior. This line is fed by a dedicated bass driver and releases the sound through a circular vent around the mid and the tweeter. Because the rounded cabinet is designed and manufactured as a single piece, there are no edges to produce diffraction (a disruption to sound precision). This results in smooth sound travel and an enhanced listening experience. According to a review on the hi-fi music gear website The Ear, “the [more complex] the music gets, the better [HYLIXA] sounds, which is the opposite of what you get with most speakers.”
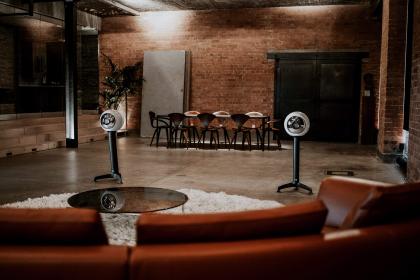
Production and prototyping for the HYLIXA speakers are done on a 3D Systems sPro™ 60 SLS printer. The speakers, which are sold in a set of two, are each printed separately within the printer’s 381 mm x 330 mm x 460 mm build volume. Evans says the team maximizes each build by nesting the other components within the speaker cabinet.
The cabinet and front baffle components of HYLIXA are printed in DuraForm® GF, a glass-filled engineering plastic that delivers an excellent surface finish that is machinable and paintable. As the primary display piece of the speakers, Node puts the HYLIXA cabinets through a methodical post-processing regimen to evacuate all material from the pieces and prepare the surfaces for whatever finishing the customer requests.
“We learned through the prototyping process that DuraForm GF actually worked very well acoustically,” says Evans. “It has almost a ceramic-like quality to the touch, which helped us both structurally and sonically. As designers, we could freely exploit SLS production to create the internal structure, but also design something that looked as beautiful as it sounds.”
“Every component that we 3D printed, we’ve done for a reason,” says Evans. “We’ve used the technology to benefit the product in one way or another, and pushed to take everything to the absolute limit.”
After launching HYLIXA in 2019, Node sent several pairs of speakers to hi-fi industry experts for their unbiased take. In addition to descriptions such as “radical,” “unusual,” and “seductive,” publication Hi-Fi+ praises the speakers for “an almost unbelievable ‘out of the box’ sound” with “an exceptional dynamic range.”
“The feedback has been even better than we first hoped, to be honest,” said Evans. Having now earned credibility within the industry, Node has more up its sleeves and is looking to grow. Evans says what’s to come is still “very top secret” at the moment, but Node remains committed to its process. 3D printing will be an integral part of the company’s strategy to differentiate itself by doing things that haven’t been done before.
Learn more about this story here.


